The moped engine were meant to produce a wide power band and cover the large gap between few speeds (if any), a small carb, made starts easier and gave good throttle response, and a very efficient silencer, made the package complete. When extracting more power from these units, short of a complete teardown, the easy route were to increase CR, lengthen the intake timing, a bigger carb and intake, some sort of exhaust upgrade (usually more noisy), and by these small enhancements, it was possible to more than double the horsepower. Drawback were usually a harder- starting engine, but the speed increase made it something you could live with. What actually happened here, was that the usable rpm- range were lifted some 1500- 2000rpm, so you had to use the gears more and shift at a higher rpm.
More power generates more heat, and if jetting were a little on the lean side, a seizure could happen! No big deal really and usually the melted aluminum piston could be saved, by dressing hard- spots with a file.
Keeping an engine at this higher level of performance, meant some servicing, and especially exhaust and silencer needed cleaning, to dispose of the layers of carbon/ oil slurry. Heating silencer with a torch, or by placing it in a stowe (mother werent pleased by that!), and oozing fumes exited both ends, but the engine loved it and regained its crispy sound! |
|
|
Most of the popular marques offered a "not for highway use" kit. Many such kits included a special piston with just one ring, to lessen parasitic friction, a cylinder with altered timing and increased port-sizes, and a bigger carb and inlet. Last but not least some kind of exhaust, usually in form of an expansion-chamber, and that left the moped without any silencing devises. The snarl of the intake, were at higher revs overpowered by the distinct high pitch-sound of the exhaust that could by heard for miles. Visual changes, like increased size of the cooling fins, also added to the race appearance.
Some of these kits were offered to convert a moped into light-mc use, but i guess most of them ended up on regular mopeds for "local street duty". |
 |
 |
 |
 |
 |
 |
 |
 |
 |
 |
 |
 engine") |
| |
|
| |
|
| |
|
| |
|
| |
|
| |
|
| |
|
| |
|
Governing agencies applied pressure to moped factories, and newer models incorporated some sort of prevention against tamperers and restrictions were cast-in!
Crankcase modifications included thin castings in places where "grinding for power" could be foreseen and space around PTO´s were limited to prevent growth of gear size.
Every country had regulations about performance and speed, and dealers were notified not to have any thing to do with speed parts. Meaning was that only clubs and off-road organisations should be allowed to buy these kits.
Some companies offered complete engine-packages containing upgraded innards, a stronger clutch, five or six speed transmission and different levels of performance. Top sets usually incorporated watercooling, disc valve inlet, an expansion chamber to match, a transitorized ignition, sprockets, and sparkplugs. These engine packages made you, short of buying a complete factory production- racer, able to join the fun by installing them into your "undressed" moped. |
 |
Which engine?
While it is possible to use any moped- engine produced before 1983, several items should be considered when choosing a powerplant. While the optimum statistically is a watercooled, six- speed short- stroked two-stroke engine with disc- valve inlet, its no good at all if parts are rare and overly expensive !
A fast reliable race- winning engine can be made from following: Kreidler, Minarelli, Sachs, Maico, and to a lesser degree: Simson, Morini, and Puch.
Kreidler is the favorite mainly due to its high- performance history, and no stone has been left unturned with this engine! An engine from an Kreidler RS 5- speed, which was sold in large quantities, can be turned into a strong 12- 13hp weekend- warrior, using readily available parts.
Drawback with Kreidler is of course prices!
The P6 Minarelli engine comes a little cheaper and was offered in a wide range of mopeds. Try a search on Ebay typing: Minarelli, Italjet, Fantic, Otus, or . Most of these models got the early longstroke version installed, as well as a wide- ratio 6- speed cluster. No problem using this combination when looking for a 10- 13hp piston- ported, air- cooled racer, but further upgrades should include the "corte corso" short- stroke crank and barrel, which will give you an engine with a higher RPM- potential. At least three different transmission- ratios are available for the P6, and one of those are suitable for track use. Watercooling- kits and disc valve conversions, are available too.
|
  |
|
Maximum output of a 50cc engine using "todays technology"!
The expert:
"The best horsepower we attained at Aprilia last year (2007 125cc GP) was 53,9 HP at 13000 rpm. This means a Pme of 14.88 at a piston speed of 23,6 m/sec. Using these same values means that a single cilinder 50cc would give 29.5 HP at 17850 rpm and a 50cc twin would give 39 HP at 23600 rpm, measured at the gearbox output shaft. I am 100% sure these values can be attained although it never will be proved due to lack of interest and money. Remember that 50cc development was stopped in 1983 and enormous progress was made in the following 24 years. Now, sadly, also the development of the 125cc two strokes has stopped, the two stroke will only survive in karting but there will be no progress because of the very strict regulations!"
Jan Thiel 2008
Update 2014:
Due to a community of hardcore twostroke- fanatics, some continuation in the evolution of the racing twostroke has been seen. The unofficial 50cc classic Eurocup- races(www.classic50racing.com) have since 2008 renewed the interest of going faster with old machinery. Many new ideas, new materials, CAD and improved testing- equipment are all ingredients for upping the useable power- curve of the small twostrokes. Aalt Toersen are believed to have reached more then 24hp from the engine of the LSR- project: www.groene-tulp.nl |
 |
Undressing a moped for track use, do lead to several compromises. A lot of weight can be removed because the moped were in many instances built to handle some load and maybe even a passenger. But when it comes to the frame itself, a little caution must be noted, be it monocoque or a tube frame, its very important that it is kept as stiff as possible, between fork mountings.
A vital area in a race frame, and a solid relationship between steering head and swing- arm mount, will leave only you to steer the bike!
Its no good if the frames stability suffers after a weight reducing action, and you will find no pleasure in riding a bike which handles like a wet noodle!
Having in mind that the suspension are tightened up, and lowered in the process, the stresses from brakes, are about the same. Steering head should be able to cope with the enlarged front brake and rear swingarm must handle the pull of the chain.
Driver size should also be taken into account, when lightening a chassis, and remember most of the pro- drivers of the 50cc class, were more or less "jockey- sized", and if you build a frame using original dimensions, will it then be able to carry you?
Building from scratch makes you decide the material and dimensions of these. Tube- frames of the twin cradle type usually got 20mm tubes of varying thicknesses. I´ve heard of as thin as 0,7mm on professionally built racers, and production moped frames mostly got 20x 2mm tubing. Your choice will be between these measurements, and if in doubt, choose the latter, as a strong chassis will give you peace of mind!
The actual frame- design will rely on the period, you want to copy: the spindly frames of the fiftees, start sixties, the lower and smaller designs of the seventies, and minimalistic designs of the eighties. |
 |
 |
Different types of frames used in the 50cc GP era:
Tube, monocoque, and the "sandwich". Tube frames came in different
layouts like: double cradle, central- tube, and backbone.
The monocoque could be made of: pressed steel, aluminum box
sections, stainless steel, or polyester. The sandwich frame
usually consists of two aluminium plates "sandwiching" the engine. |
 |
 |
 |
 |
 |
 |
 |
|
| |
|
| |
|
| |
|
| |
|
3: Suspension - a compromise.
The biggest enemy when building up speed in the 50cc class is wind resistance. The larger the frontal area, the more drag, and going for the lowest possible frontal area, makes no room for suspension travel! As you got to have some sort of suspension, so you wont get thrown off, you must realize that limiting suspension- travel, equals a higher top speed. Usually you end up with a front fork with less than 50mm of travel, and even less in the rear.
Springrates should be increased to prevent suspension from bottoming out, and this is normally done by shortening spring the same amount as fork- tubes. When shortening a standard hydraulic fork, sometimes a change in the bounce/ rebound action is called for, but this is a job better left for the pros!
Lower legs of the front forks, normally cast aluminum, can be reduced in length in the seal area, by machining seat in a lathe. Sometimes the seal can be refitted as much as 30mm lower, and by that you can lower the bike same amount. A narrower triple- clamp that brings the fork tubes closer together, again leaving you with a lower frontal area.
|
|
 |
Shortening a front fork starts with draining oil, removing top cap and spring, and measuring travel, before complete disassembly. |
 |
Inside fork legs are two seals held by a circlip. |
 |
Use a lathe with center support to lower seals in fork leg. |
 |
Travel length can be reduced- |
 |
by shortening damper- rod. |
 |
Shortened fork tubes gets an inside groove, then a circlip will replace threaded- cap. |
|
|
  |
In the rear spring rate and travel can be titleered by inclining the units. Notice sixties japanese racers and you´ll see rather short rear shocks standing right up, a good way to increase spring rate and saving weight at the same time. Shortening of rear units is somewhat harder, since most units are sealed and disassembly impossible. But these units are widely interchangeable, mainly due to similarities in mounting, so shop around for a better result. If you are lucky enough to have a shock with a thread same size as the piston- rod, its possible to reduce overall length. You can, after carefully grinding through the thin chrome- layer, cut the thread as far as needed, and cut off the un- needed threads. Remember to add a rubber bump- stop before re- assembly! |
 |
| |
|
| |
|
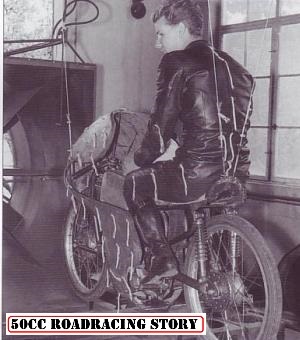
4: Aerodynamics - sleek and slippery.
This section should really be the first!
Frame design, front fork, engine placement, position of driver via clip- ons and footpegs, and route of the exhaust all comes into play, when fairing design are planned.
Raising the engine in frame will result in a higher centre of gravity, nonetheless this is a widely used modification, because of a smoother underside of fairing. That and a rearward facing exhaust is a bonus too, even if drivers legs is in close proximity to the upswept chamber.
Shape of fuel tank and placement of filler cap, should be considered, allowing driver to hide helmet fully behind screen. Angle of clip- ons could be altered to enhance aerodynamics too, and (one thing I forgot when building my first bike) optimize relationship between knees and elbows, when you tuck in. To make that possible do not increase wheelbase, move seat rearwards instead, even if it looks out of place.
Limiting frontal area will make your bike go faster! Short of using a windtunnel, viewing your bike from the front can give your ideas. Place one of your equal- sized friends on your bike, and let him assume position, while you eyeball it over. Making your bike more slippery can make up for lack of horsepower - to a certain degree!
Mounting of fairing:
A solid mount should be avoided as holes in fiberglass, tends to be enlarged, due to engine vibrations and wind- buffering. Dzus- fasteners are an exception, because a seperate mount are riveted in place on fairing, leaving a spring- loaded metal- metal contact to frame.Other solutions includes a piece of rubber- hose slid over piping, one fastened on fairing, other on frame. Large washers on both sides of fiber, sandwiching a rubber- grommet works too, but looks a bit clumsy viewed from the outside!
Steering angle, lock to lock should be reduced, to minimize cutouts in fairing.
|
 |
  |
The factories invested heavily in this area, and many hours were spent in the wind tunnels.
When Jan de Vries Van Veen Kreidler exceeded 200km/h during the 1973 Belgian GP at Spa,
it was due to thorough sessions at the windtunnel. |
  |
 |
5: How much replica can you afford ?
Build your own replica or buy one of the many kits offered. Check out the link- list, and make searches on Ebay typing "50cc racer" and it will come to you.
If youre mechanically inclined, its possible to assemble a competitive classic racer, if you take time to gather the right parts.
And what would be the right parts?
To look right the bike should be low, narrow, and do remember the most distinctive ingredient for all years of 50cc GP racing, the 2 and 2,25x18" tires. In a field of 50cc racers, a bike fitted with anything else, will appear clumsy and really stand out!
Currently the choice of 2x 18" and 2,25x 18" race- tires are limited to those offered by Bridgestone and Heidenau.
Mind you I´m not really sure the Heidenau 2.00x 18 is a real two- incher, and be prepared that you have to wait for the Bridgestone Accolade. It isnt a regular production tire, and are only made in limited batches!
The classic high- shouldered rims are now produced in China, and sizes 1,2x 18 and 1,4x 18 inch are available with 36 holes. Nice rims which seems to be a little thicker (heavier), than the originals from Borrani, SanRemo, D.I.D., Campagnolo and Akront earlier known as a size WM0. These can be had with or without holes drilled, and if youre buying beware of the spoke- angle used! A rim drilled for a small frontbrake or a disc- brake hub, dont have the right angle if youre going to use a large drum! The Chinese pre- drilled ones do have an angle layout that´s in between, and usually fits okay. If you opt for the DIY solution, start out by fitting inside spokes on one side of the hub, with nipples halfway on and determine angle by twisting hub, with spokes on top of rim. Do take your time and get it right! |
Very nice front brakes can be found on small Japanese and Italian motorcycles, of the 125- 350cc sizes. Most of these seventies bikes ran 18" wheels, which means that you get the right spokes as well, when buying a complete wheel.
 |
Its possible to improve looks of these drum- brakes, by drilling lightening holes in the right places. Do not weaken the unit by removing material in the ribbed area!
Its advisable to add a screen covering the larger holes (>15mm), and stainless net can be glued into place. A nice detail here is to form the net into a cup, which makes you able to fit it into the hole, leaving a very smooth outside surface!
Another issue when using these large (160- 180mm) one sided duplex drums is the twisting force executed on forklegs, and a tube- diameter of at least 28mm should be used.
Same problem when dealing with disc- brakes! |
It would be nice to have the double sided duplex brakes or a twin disc setup, but rare and far between, make these very pricey.   |
Then again you could do them yourself! A lathe and a chunk of aluminum could make a hub, and anchor plates could be cast or welded up too, from the same material. Lever kits for double- sided drums are available, or do them yourself, by studying pictures.
When it comes to twin- disc setups, biggest issue here is to weld brackets for caliphers to fork legs. |
|
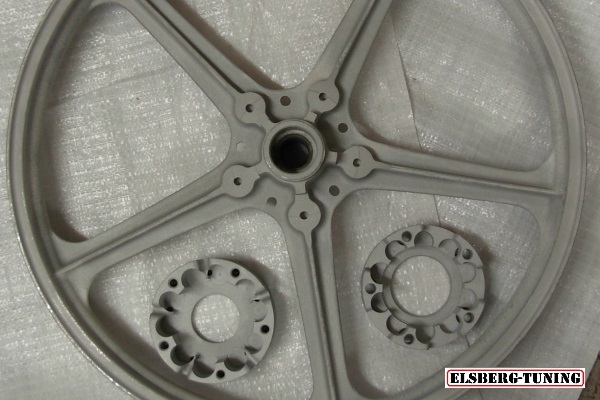
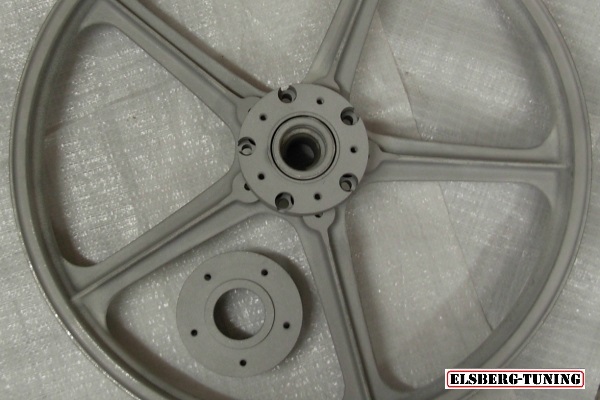
If youre going for the cast- wheel look, both Suzuki and Kawasaki sold mopeds sporting 1,4x 18 inchers. The Kawasaki one looks similar to the original Campagnolo, but heavier. Maybe they can be trimmed somewhat? |
 |
Rear brakes on these models are a 110mm drums, but its possible to convert it to a disc hub.
Or you can import these Chinese- made 1,4x 18" replicas! |
 |
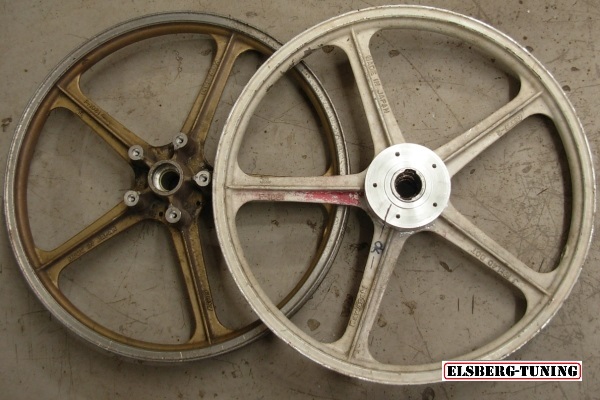
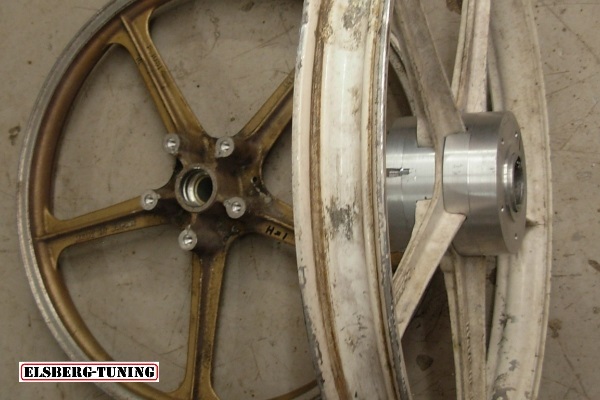
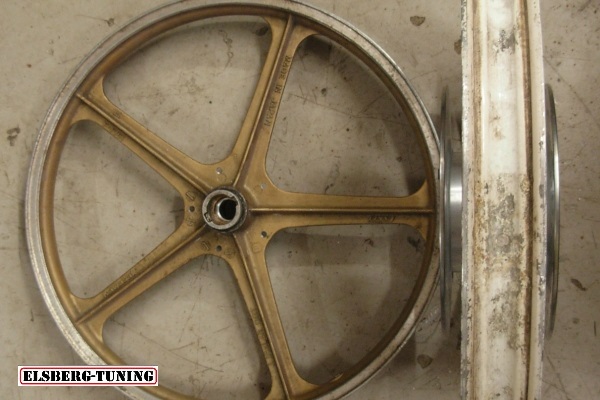
| Converting AR50 rims for dual- disc setup: |
 |
 |
 |
 |
 |
 |
 |
| |
|
| |
|
| |
|
| |
|
| |
|
| |
|
| |
|
| |
|
| |
|
| |
|
| |
|
| |
|
| |
|
| |
|
| |
|
| |
|
| |
|
| |
|
| |
|
| |
|
| |
|
| |
|
| |
|


